Topic model in Python: finding the number of topics in political blogs
In this example you build a small research project from an empty folder and run it on the cluster.
The project fits a topic model to 5,000 posts from six US political blogs of 2008. A topic model finds groups of words that often appear together in a collection of texts. Each group is a topic. You decide how many topics the model looks for, and a common way to decide is to fit the model several times and compare the fits. You will fit it six times, with 5, 10, 15, 20, 25 and 30 topics.
You write the code on your computer and test one fit there. Then the cluster runs all six fits at the same time, and you bring the results back to your computer to compare them.
The finished files are next to this page: run.py, runs.txt, job.slurm, setup.slurm and combine.py. If something does not work, you can compare your files with them.
Time: 45 min
Before you start
You need a computer that is set up for the cluster, as described in the
setup guide, and sc-starter, as
Install sc-starter describes. When you type
sc-starter check in a terminal, it should print Ready.
You also need a code editor. VS Code is free and works on all three systems.
You do not need to install Python yourself. A program called uv, which you installed for sc-starter, takes care of it. Packages: uv and renv explains what uv does.
Plan the project
Before you write code, decide what one run of the project is. Here, one
run fits the model once, with one number of topics. The number of topics
is the only thing that changes from run to run. So the main script,
run.py, takes it as an argument: python run.py 10 fits a model
with 10 topics.
Each run saves its result in a file of its own, in a folder called
results, with the number of topics in the name, such as
results/k-10.csv. Six runs that end at the same time would otherwise
overwrite each other's results. A last script, combine.py, puts the six
results side by side on your computer.
A fit takes about a minute. All six one after another would take a few minutes, which still fits on your own computer. A real analysis would let each model run longer and try more numbers of topics, and then the runs take hours. On the cluster, the runs run side by side, so all six take no longer than the longest one.
The cluster runs the script six times. A text file, runs.txt, lists the
six commands, one per line. A second file, job.slurm, tells the cluster
how much time, memory and computing power each run needs. You take these
values from a test on your own computer.
When the project is finished, the folder looks like this:
python-topic-model/
├── data/poliblog5k.csv.gz   the blog posts
├── run.py                   fits one model
├── runs.txt                 the six commands for the cluster
├── job.slurm                what each run needs
├── setup.slurm              installs the packages on the cluster
├── combine.py               compares the six fits
├── pyproject.toml           the project's packages
├── uv.lock                  their exact versions
└── results/                 what the runs write
Part 1: Build and test the project on your computer
1. Create the project
Open a terminal. Move to the folder where you keep your projects with
cd and the name of the folder, for example cd Documents. Then create
a folder for this project and move into it:
mkdir python-topic-model
cd python-topic-model
All further commands on this page run in this folder. If you open a new
terminal later, move into the folder again with cd.
Now set up the folder as a Python project with uv. uv installs Python and the packages a project needs. It keeps them inside the project folder, so that different projects do not interfere with each other.
uv init --bare --python 3.12
uv python pin 3.12
uv add tomotopy==0.14.0 numpy==2.5.4 matplotlib==3.11.2
The first command creates pyproject.toml, a short file that describes
the project. The second creates .python-version, which tells uv to use
Python 3.12 for this project, on your computer and later on the cluster.
The third command installs three packages. tomotopy fits topic models, numpy does calculations with tables of numbers, and matplotlib draws figures. The version numbers are fixed, so that your results match the ones shown here as closely as possible.
uv also writes a file called uv.lock. It records the exact version of
every package, including the packages that these three depend on. The
cluster will install exactly these versions. The packages themselves are
stored in a hidden folder called .venv, the project's environment.
Open the project folder in your editor. In VS Code, choose
File › Open Folder and select python-topic-model.
Check: Ask tomotopy for its version number:
uv run python -c "import tomotopy; print(tomotopy.__version__)"
0.14.0
uv run starts a command with the project's Python and packages. You
will use it whenever you run something from this project on your computer.
2. Download the data
The data set is called poliblog5k. It holds 5,000 blog posts from the time of the 2008 US presidential election, taken from three liberal and three conservative blogs. It is a sample of the CMU 2008 Political Blog Corpus (Eisenstein and Xing 2010). It comes with the R package stm, which is published under the MIT licence.
Download the file into a new folder called data:
curl -L --create-dirs -o data/poliblog5k.csv.gz https://raw.githubusercontent.com/juhehehe/sc-starter/main/examples/python/python-topic-model/data/poliblog5k.csv.gz
On Windows, type curl.exe instead of curl, because in PowerShell the
word curl starts a different command.
The file is a compressed table, 1.6 MB in size. Each row is one post, and
the column words holds its text. The text has already been prepared for
a topic model. Very common words such as "the" have been removed, and
each word has been cut down to its stem. The words are also sorted
alphabetically. A stem like econom stands for economy, economic and
economics. The order of the words does not matter here, because a topic
model only counts how often each word appears in a post. The other three
columns hold the blog, its political leaning and the day of the year.
Check: Count the posts and show the beginning of the first one:
uv run python -c "import csv, gzip; posts = list(csv.DictReader(gzip.open('data/poliblog5k.csv.gz', 'rt'))); print(len(posts), 'posts'); print(posts[0]['blog'], posts[0]['rating'], posts[0]['day'], posts[0]['words'][:50])"
5000 posts
ha Conservative 182 acknowledg acknowledg across alreadi american anot
3. Write the model script
In your editor, create a new file in the project folder and save it as
run.py. You will add the code in five parts. Paste each part at the end
of the file.
The script uses a model called LDA (latent Dirichlet allocation, Blei et al. 2003), a widely used topic model. LDA starts from a random guess of which words belong to which topic and then improves this guess over many rounds. The script runs 1,000 rounds, which is enough for 5,000 posts.
Start with the description of the script, the packages it needs and a few fixed settings:
"""One run of the topic model: fit LDA with K topics on the political blogs.

Usage: python run.py <K>
Writes results/k-<K>.csv with two quality measures and
results/k-<K>-topics.txt with the most probable words of each topic.
"""

import csv
import gzip
import os
import sys
import time
from pathlib import Path

import numpy as np
import tomotopy as tp

DATA = Path("data/poliblog5k.csv.gz")
RESULTS = Path("results")
# Rounds of Gibbs sampling; enough for 5,000 posts to settle.
ITERATIONS = 1000
# Both quality measures look at the top words of each topic.
TOP_WORDS = 10
The first six imports come with Python, the last two are the packages you
installed. DATA and RESULTS are
paths relative to the project folder, so they work on your computer and on
the cluster. ITERATIONS sets how many rounds the model trains.
Next, add a function that reads the posts. It opens the compressed file and returns the words of each post:
def read_posts(path):
    """Return the words of each post, one list per post."""
    with gzip.open(path, "rt", encoding="utf-8", newline="") as file:
        return [row["words"].split() for row in csv.DictReader(file)]
The script judges each fitted model by two measures. Coherence checks whether the main words of a topic tend to appear in the same posts, and tomotopy calculates it for you. Exclusivity checks whether the main words of a topic belong to that topic alone. The next two functions calculate exclusivity in the same way as the R package stm, so you can compare the results with the R version of this example. You can use them without following the details:
def exclusivity(model):
    """Measure how much the top words of a topic belong to that topic only.

    The measure of exclusivity() in the R package stm, so that this example
    and r-topic-model report the same thing. Within each topic, every word
    gets two ranks: how frequent it is in the topic, and how exclusive (the
    share of the word's weight across all topics that lies in this topic).
    FREX combines both, with 70% weight on exclusivity. The score of a
    topic is the sum over its top words, at most 10; this returns the mean
    over topics.
    """
    weights = np.array([model.get_topic_word_dist(t) for t in range(model.k)])
    shares = weights / weights.sum(axis=0)
    frex = 1 / (0.7 / ranks(shares) + 0.3 / ranks(weights))
    top = np.argsort(-weights, axis=1)[:, :TOP_WORDS]
    return float(np.take_along_axis(frex, top, axis=1).sum(axis=1).mean())


def ranks(values):
    """Return the rank of each value within its row, from 1/n for the lowest to 1."""
    return (values.argsort(axis=1).argsort(axis=1) + 1) / values.shape[1]
The fourth part does the actual work. It reads the number of topics, fits the model, measures it and saves the results:
def main():
    """Fit the model with the K given on the command line, and save it."""
    if len(sys.argv) != 2 or not sys.argv[1].isdigit():
        sys.exit("Usage: python run.py <number of topics>")
    k = int(sys.argv[1])

    # The model with K topics and a fixed seed, so that the same K gives
    # the same topics, and the posts it learns from.
    model = tp.LDAModel(k=k, seed=1)
    for words in read_posts(DATA):
        model.add_doc(words)

    # Left alone, tomotopy starts one worker per core of the whole node, and
    # they crowd onto the cores this job booked. So as many workers as
    # job.slurm books; one on your own computer.
    cores = int(os.environ.get("SLURM_CPUS_PER_TASK", "1"))
    started = time.perf_counter()
    model.train(iterations=ITERATIONS, workers=cores)
    minutes = (time.perf_counter() - started) / 60

    # UMass coherence: do the top words of a topic appear in the same posts?
    coherence = tp.coherence.Coherence(model, coherence="u_mass", top_n=TOP_WORDS)

    # The two measures and the time, as one row of results/k-<K>.csv.
    RESULTS.mkdir(exist_ok=True)
    with open(RESULTS / f"k-{k:02d}.csv", "w", newline="") as file:
        writer = csv.writer(file)
        # The job, so that combine.py can tell results of an earlier job apart.
        writer.writerow(["k", "coherence", "exclusivity", "minutes", "job"])
        writer.writerow(
            [
                k,
                round(coherence.get_score(), 4),
                round(exclusivity(model), 4),
                round(minutes, 2),
                os.environ.get("SLURM_ARRAY_JOB_ID", ""),
            ]
        )

    # The seven most probable words of each topic, to read what it is about.
    topics = [
        f"Topic {t + 1:2d}: "
        + ", ".join(word for word, _ in model.get_topic_words(t, top_n=7))
        for t in range(k)
    ]
    (RESULTS / f"k-{k:02d}-topics.txt").write_text("\n".join(topics) + "\n")
    print(f"K = {k} done in {minutes:.1f} minutes")
Four things in this part matter for running the script on the cluster.
The number of topics comes from the command line. sys.argv holds the
words you type after the name of the script, so python run.py 10 sets
k to 10. This is what allows one script to do six different fits.
The model starts from a fixed seed, seed=1. A seed is the starting
number for the random guesses of the model, so the same seed always
produces the same guesses. With the same seed and the same number of
topics, you get the same model on your computer and on the cluster.
The script uses only as many processor cores as the cluster gave it. The
cluster tells each run how many cores it has in a variable called
SLURM_CPUS_PER_TASK. Without this line, tomotopy would try to use all 32
cores of the computer it runs on, although the run was given only one. On
your computer the variable does not exist, and the script uses one core.
Each run saves its results in files of its own. The number of topics is
part of each file name, for example results/k-10.csv. Six runs that
finish at the same time therefore never overwrite each other's results.
Finally, add two lines that start main when you run the file:
if __name__ == "__main__":
    main()
Save the file.
4. Test one fit on your computer
Run the script once with 5 topics. Mistakes show up here within seconds. On the cluster, you would see them only after your job has waited for its turn.
uv run run.py 5
The fit takes about a minute. Then the script prints:
K = 5 done in 0.8 minutes
Check: The folder results now contains two files. results/k-05.csv
holds the two measures:
k,coherence,exclusivity,minutes,job
5,-0.9977,8.9361,0.83,
The number of minutes on your computer will differ, but coherence and
exclusivity should be the same, because the seed fixes the model.
The column job stays empty on your computer. The second file,
results/k-05-topics.txt, lists the five topics with their most likely
words.
If it did not work
If you see ModuleNotFoundError: No module named 'tomotopy', the
packages are missing. Run the uv add command from step 1 again, in the
project folder.
If you see FileNotFoundError with the name of the data file, either
the terminal is not in the project folder or the data are missing. Move
into the folder with cd, or repeat step 2.
5. Measure what a run needs
The cluster needs to know how much time and memory a run takes. Measure the largest run, the one with 30 topics, because it takes longest:
uv run run.py 30
At the end, the script prints how many minutes the fit took. While it runs, open the task manager of your computer: Activity Monitor on macOS, Task Manager on Windows, System Monitor on Linux. Find the process python and note the highest memory value you see.
The fit with 30 topics takes about 1.3 minutes and uses about 150 MB of memory.
Check: You know how many minutes the run with 30 topics took and roughly how much memory it used.
Part 2: Prepare the project for the cluster
6. List the runs
Create a file called runs.txt and write the six commands into it, one
per line:
python run.py 5
python run.py 10
python run.py 15
python run.py 20
python run.py 25
python run.py 30
Each line is one run, and the line number is the run number. Line 3, for example, is run 3. Do not add empty lines or comments, so that the line numbers stay the same as the run numbers.
The lines start with python instead of uv run. On the cluster, the
job script switches to the project's environment before each run, so
python already includes the packages.
7. Write the job script
A job script tells Slurm what each run needs and what it should do.
Create a file called job.slurm:
#!/bin/bash
# One run per line of runs.txt; run N is line N, here one number of topics.
# Submit from your computer with `sc-starter submit`, after running
# `sc-starter submit setup.slurm` once.

#SBATCH --job-name=python-topic-model  # name in the queue and in the output files
#SBATCH --partition=cpu-xeonv3         # standard CPU partition; sinfo -s lists them all
#SBATCH --cpus-per-task=1              # one core, so that the same seed gives the same model
#SBATCH --mem=1G                       # 1 GB of memory per run
#SBATCH --time=00:10:00                # Slurm stops a run after 10 minutes
#SBATCH --output=%x-%A_%a.out          # job name, job ID, run number
#SBATCH --mail-type=END,FAIL           # email when the whole array has ended or failed

# uv, which setup.slurm installed for your account.
export PATH="$HOME/.local/bin:$PATH"

# This run's line of runs.txt, for example "python run.py 10".
run=$(sed -n "${SLURM_ARRAY_TASK_ID}p" runs.txt)
# No such line, as when runs.txt got shorter: end the run as FAILED.
[ -n "$run" ] || { echo "runs.txt has no line $SLURM_ARRAY_TASK_ID"; exit 1; }
echo "Run $SLURM_ARRAY_TASK_ID on $(hostname -s): $run"
# Run it with the project's Python and packages, which setup.slurm put
# into .venv. --no-sync uses them as they are and installs nothing.
uv run --no-sync bash -c "$run"
The first line, #!/bin/bash, says that the file is a script for bash,
the program that runs commands on the cluster. The lines that begin with
#SBATCH are requests to Slurm. They must come before the first command,
because Slurm stops reading them there. All other lines that begin with
# are comments.
The #SBATCH lines ask for one processor core, 1 GB of memory and at most
10 minutes for each run. The values come from your measurement in step 5:
1 GB is several times the 150 MB that the largest run used, and 10
minutes leave room for a computer of the cluster that is slower than
yours. The runs go to cpu-xeonv3, the standard partition for jobs
without a GPU. Slurm saves everything a run prints in an
output file, whose name is made of the job name, the job ID and the run
number. When all runs have finished, Slurm sends you an email.
Below the #SBATCH lines are the commands that each run carries out, in
this order:
- The line with
PATHtells bash where uv is, which the setup job installed. - The line with
sedpicks this run's line out ofruns.txt. Slurm gives each run its number in a variable calledSLURM_ARRAY_TASK_ID, so run 3 reads line 3,python run.py 15. - The next line stops the run with an error if
runs.txthas no such line. echoprints the run number, the name of the node and the command, so that you can see them in the output file.uv run --no-sync bash -c "$run"runs the command with the project's Python and packages, which the setup job put into.venv.--no-syncmakes uv take them as they are and install nothing during the run.
For a full list of #SBATCH options, see the
Slurm documentation for sbatch.
8. Write the setup script
The cluster needs the same packages as your computer. A short job installs
them once, before the six runs. Create a file called setup.slurm:
#!/bin/bash
# Install this project's Python and packages on the cluster, once.
# Submit from your computer with `sc-starter submit setup.slurm`, before the
# first `sc-starter submit`. Compute nodes have internet; the login node is
# not for installing.

#SBATCH --job-name=python-topic-model-setup  # name in the queue and in the output file
#SBATCH --partition=cpu-xeonv3               # standard CPU partition
#SBATCH --cpus-per-task=1                    # downloading needs one core
#SBATCH --mem=2G                             # 2 GB of memory
#SBATCH --time=00:15:00                      # usually under a minute
#SBATCH --output=%x-%j.out                   # job name and job ID

# Stop at the first command that fails, so that the job ends as FAILED
# rather than COMPLETED. It comes after the #SBATCH lines, since Slurm
# reads those only up to the first command.
set -e

# uv installs Python and the packages. The first time, fetch uv itself
# into ~/.local/bin, the same place as on a Linux computer.
export PATH="$HOME/.local/bin:$PATH"
if ! command -v uv > /dev/null; then
  curl -LsSf https://astral.sh/uv/0.12.10/install.sh | env UV_NO_MODIFY_PATH=1 sh
fi

# Exactly the versions in uv.lock, into .venv in this folder; uv fetches
# Python 3.12 first if the cluster does not have it. --locked stops if
# uv.lock does not match pyproject.toml, instead of quietly changing it.
uv sync --locked
This job runs on one of the cluster's compute nodes. It installs uv for
your account if it is not there yet, and then installs exactly the
package versions from uv.lock. You could type these commands on the
cluster yourself, but the computer you type them on, the login node, is
shared by everyone and must not be used for installing or computing.
This job has no list of runs, so it runs once.
Part 3: Run the project on the cluster
9. Install the packages on the cluster
Check first that your computer still reaches the cluster:
sc-starter check
It prints Ready. If not, it says what is missing, such as the VPN. Then
start the setup job:
sc-starter submit setup.slurm
Uploaded 8 files (1.8 MB) to sc-export:~/sc-projects/python-topic-model
Submitted job 28404223. See how it goes with `sc-starter status`.
sc-starter has copied your project to the cluster, into a folder called
sc-projects/python-topic-model in your home directory there. Your
.venv and results folders stayed on your computer, because the cluster
builds its own. Then sc-starter handed setup.slurm to Slurm, which gave
the job a number, the job ID. Your job ID will be different.
Check how the job is doing:
sc-starter status
As long as the job waits for a free computer, its state is PENDING.
While it runs, the state is RUNNING. The setup usually takes less than a
minute, so run the command again after half a minute.
Check: The state of the job is COMPLETED:
Job 28404223: 1 COMPLETED

run  state      exit  node  elapsed
-    COMPLETED  0:0   t010  00:00:12
To see what the setup job printed, type sc-starter log. The end of its output lists the
installed packages, for example + tomotopy==0.14.0.
10. Start the six runs
sc-starter submit
Submitted job 28514701 with runs 1-6. See how it goes with `sc-starter status`.
This time you did not name a file, so sc-starter submitted job.slurm.
It counted the six lines of runs.txt and asked Slurm for six runs.
Follow the runs with sc-starter status. After a minute or so, it shows
something like this:
Job 28514701: 4 COMPLETED, 2 RUNNING

run  state      exit  node  elapsed   command
1    COMPLETED  0:0   t010  00:00:53  python run.py 5
2    COMPLETED  0:0   t010  00:00:54  python run.py 10
3    COMPLETED  0:0   t010  00:01:02  python run.py 15
4    COMPLETED  0:0   t010  00:01:04  python run.py 20
5    RUNNING          t010  0:41      python run.py 25
6    RUNNING          t010  0:40      python run.py 30
Each line is one run, with its command from runs.txt. The runs do not
need your computer. You can close it, and Slurm will email you when all
runs have finished.
To see what a single run printed, add its number:
sc-starter log 3
Run 3 on t010: python run.py 15
K = 15 done in 1.0 minutes
Check: sc-starter status shows all six runs as COMPLETED.
If it did not work
If a run is FAILED, sc-starter log with its number shows the error
message. Fix the problem on your computer and test the run there. Then
submit only the failed runs again with
sc-starter submit --lines failed.txt. The file failed.txt was written
by sc-starter status and lists their numbers.
If the runs stay PENDING for a long time, other jobs are ahead of
yours or no computer is free. This is normal when the cluster is busy,
and the runs will start on their own.
Troubleshooting explains more error messages.
11. Bring the results back
sc-starter pull
Pulled 19 files (0.0 MB) into this folder.
sc-starter has copied the results folder from the cluster into your
project folder. It also brought back the output files, one per run and
one for the setup job, for example python-topic-model-28514701_3.out.
Check: The folder results contains twelve files, two for each
number of topics, from k-05.csv to k-30-topics.txt. The file
k-05.csv from your test on your computer has been replaced by the one from
the cluster, which has the job ID in its last column.
Part 4: Compare the six models
12. Put the results side by side
The last script runs on your computer. It reads the six result files,
prints them as one table and draws a figure. Create a file called
combine.py and add the code in four parts, as before.
The first part loads the packages and names the folder with the results:
"""On your computer, after `sc-starter pull`: put all runs side by side.

Usage: uv run combine.py
Reads results/k-*.csv, names missing runs, prints the table and draws
results/choose-k.png: coherence against exclusivity, one point per K.
"""

import csv
import sys
from collections import Counter
from pathlib import Path

import matplotlib.pyplot as plt

RESULTS = Path("results")
NUMBERS = ["k", "coherence", "exclusivity", "minutes"]
The second part reads the results. read_results collects every file
k-*.csv from the results folder. planned_k reads the numbers of
topics from runs.txt, so the script can tell if a run is missing:
def read_results():
    """Return one dict per finished run, ordered by K."""
    rows = []
    for path in RESULTS.glob("k-*.csv"):
        with open(path, newline="") as file:
            rows.extend(csv.DictReader(file))
    for row in rows:
        for name in NUMBERS:
            row[name] = float(row[name])
    return sorted(rows, key=lambda row: row["k"])


def planned_k():
    """Return the K of each line of runs.txt, such as 10 for `python run.py 10`."""
    lines = Path("runs.txt").read_text().splitlines()
    return [int(line.split()[-1]) for line in lines if line.strip()]
The third part draws a figure with two panels, one for each measure:
def draw(rows, path):
    """Draw both measures against K, side by side, each with its own scale."""
    k = [row["k"] for row in rows]
    panels = [
        ("coherence", "UMass coherence\nhigher: the words of a topic appear together"),
        ("exclusivity", "Exclusivity\nhigher: the words belong to one topic only"),
    ]
    fig, axes = plt.subplots(1, 2, figsize=(10, 4.4), layout="constrained")
    for ax, (measure, title) in zip(axes, panels, strict=True):
        ax.plot(k, [row[measure] for row in rows], color="#2a78d6", marker="o")
        ax.set_title(title, loc="left", fontsize=10)
        ax.set_xticks(k)
        ax.set_xlabel("Number of topics (K)")
        ax.spines[["top", "right"]].set_visible(False)
    fig.suptitle("Political blogs 2008: more topics, less coherent, more exclusive")
    fig.savefig(path, dpi=100)
    plt.close(fig)
The fourth part puts everything together. Before it prints the table, it
checks the results. sc-starter never deletes anything on the cluster, so
the results folder may still contain files from runs that are no longer
in runs.txt. The script leaves those out and tells you. It also reports
which job the results come from and whether any run is missing:
def main():
    """Put the results of all runs side by side, as a table and a figure."""
    rows = read_results()
    if not rows:
        sys.exit("No results yet. Run `sc-starter pull` first.")

    # Nothing on the cluster is deleted, so results/ may still hold runs
    # that an earlier runs.txt asked for.
    planned = planned_k()
    old = [int(row["k"]) for row in rows if int(row["k"]) not in planned]
    if old:
        print(
            "Left out results of runs not in runs.txt: "
            f"K = {', '.join(map(str, old))}.",
            file=sys.stderr,
        )
        rows = [row for row in rows if int(row["k"]) in planned]
    if not rows:
        sys.exit(
            "No results for the runs in runs.txt yet. Run `sc-starter pull` first."
        )

    # A run that fails in a later job leaves its earlier result in place.
    jobs = Counter(row["job"] for row in rows)
    print(
        "Runs per job: "
        + ", ".join(f"{count} from job {job}" for job, count in sorted(jobs.items()))
    )

    missing = sorted(set(planned) - {int(row["k"]) for row in rows})
    if missing:
        print(
            f"No results for K = {', '.join(map(str, missing))}. "
            "`sc-starter status` shows why.",
            file=sys.stderr,
        )

    # One line per run: K, the two measures and the minutes it took.
    print(f"{'k':>3} {'coherence':>10} {'exclusivity':>12} {'minutes':>8}")
    for row in rows:
        print(
            f"{row['k']:3.0f} {row['coherence']:10.4f} "
            f"{row['exclusivity']:12.4f} {row['minutes']:8.2f}"
        )

    draw(rows, RESULTS / "choose-k.png")
    print(f"Wrote {RESULTS / 'choose-k.png'}")


if __name__ == "__main__":
    main()
Save the file and run it:
uv run combine.py
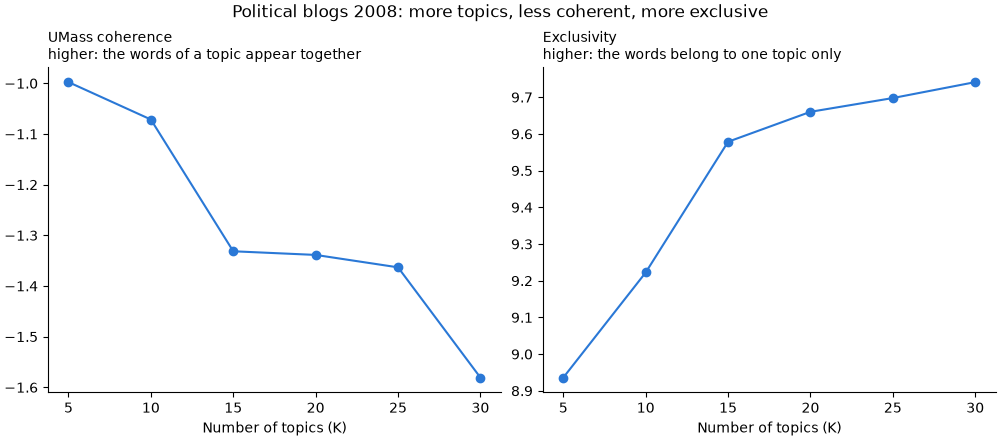
Check: The script prints one line for each number of topics and saves the figure:
Runs per job: 6 from job 28514701
  k  coherence  exclusivity  minutes
  5    -0.9977       8.9361     0.80
 10    -1.0715       9.2224     0.82
 15    -1.3315       9.5786     0.95
 20    -1.3387       9.6602     0.99
 25    -1.3632       9.6977     1.04
 30    -1.5807       9.7411     1.13
Wrote results/choose-k.png
The figure is saved as results/choose-k.png:
Reading the results
There is no single correct number of topics. The two measures move in opposite directions, and you look for a number at which both are still acceptable, as Roberts et al. (2019) recommend for stm.
Coherence (Mimno et al. 2011) measures whether the main words of a topic appear in the same posts. Values closer to 0 are better. Exclusivity measures whether the main words of a topic belong to that topic alone. Higher values are better, and the maximum is 10.
As the number of topics grows, coherence falls and exclusivity rises. Between 15 and 25 topics, exclusivity still rises while coherence hardly changes. At 30 topics, coherence drops clearly. For these blogs, 20 to 25 topics is a reasonable choice. The R version of this example, which uses stm, arrives at about 20.
The topics reflect the 2008 campaign. Here are four of the ten topics in
results/k-10-topics.txt:
Topic  5: iraq, war, militari, troop, iraqi, forc, american
Topic  6: will, tax, govern, year, american, economi, econom
Topic  7: mccain, palin, john, campaign, said, sen, say
Topic  9: obama, campaign, barack, hillari, clinton, senat, said
With 30 topics, the financial crisis gets a topic of its own:
crisi, financi, bailout, market, mortgag, bank, hous. Some topics, such
as one, even, time, like, get, can, just, consist of words that are
frequent in every post. The R version ranks the words of a topic by a
measure called FREX, which favours words typical of that topic, so such
common words do not appear there.
On the cluster, the six fits ran at the same time and took about a minute instead of six. With more texts or more numbers of topics, the time you save grows accordingly.
Using the project with your own texts
To use your own texts, save them as a CSV file with one row per text and
its words in a column called words, separated by spaces. Compress the
file with gzip, as the example data are, or change gzip.open to open
in read_posts. Prepare the words as for any topic model, which usually
means lower case, no punctuation and no very common or very rare words.
Then change DATA in run.py and test one fit on your computer.
Larger data need more time and memory. Set --time and --mem in
job.slurm generously for the first runs, and then check what a run
really used, as described in
Choosing time and memory.
To try other numbers of topics, change the lines of runs.txt and run
sc-starter submit again. Wait until no run of the previous job is still
waiting, because a waiting run reads runs.txt only when it starts.
To add a package, install it on your computer with uv add followed by the
name of the package. Then run sc-starter submit setup.slurm again before
the next runs.
Bring your own project goes through these points for a project of your own.
Removing the project from the cluster
The folder sc-projects/python-topic-model on the cluster holds your
files, the installed packages and the results. Once you have your
results, you can delete it:
ssh sc-export rm -rI sc-projects/python-topic-model
rm -rI asks once before it deletes. Type y and press Enter. uv itself and its store of downloaded
packages stay in your home directory, so that later projects can use
them. Keep your account tidy explains how
to see and remove them.
Sources
- Data: Eisenstein, J., & Xing, E. (2010). The CMU 2008 Political Blog Corpus. Carnegie Mellon University. The sample poliblog5k comes from the R package stm, which is published under the MIT licence.
- LDA: Blei, D. M., Ng, A. Y., & Jordan, M. I. (2003). Latent Dirichlet allocation. Journal of Machine Learning Research, 3, 993–1022. https://www.jmlr.org/papers/v3/blei03a.html
- Coherence: Mimno, D., Wallach, H., Talley, E., Leenders, M., & McCallum, A. (2011). Optimizing semantic coherence in topic models. Proceedings of EMNLP 2011, 262–272. https://aclanthology.org/D11-1024/
- Exclusivity and choosing the number of topics: Roberts, M. E., Stewart, B. M., & Tingley, D. (2019). stm: An R package for structural topic models. Journal of Statistical Software, 91(2). https://doi.org/10.18637/jss.v091.i02
- tomotopy, the topic model library, and uv, the program that manages Python projects.